Photography Tutorial and Camera Setup Infographic
Full prompt
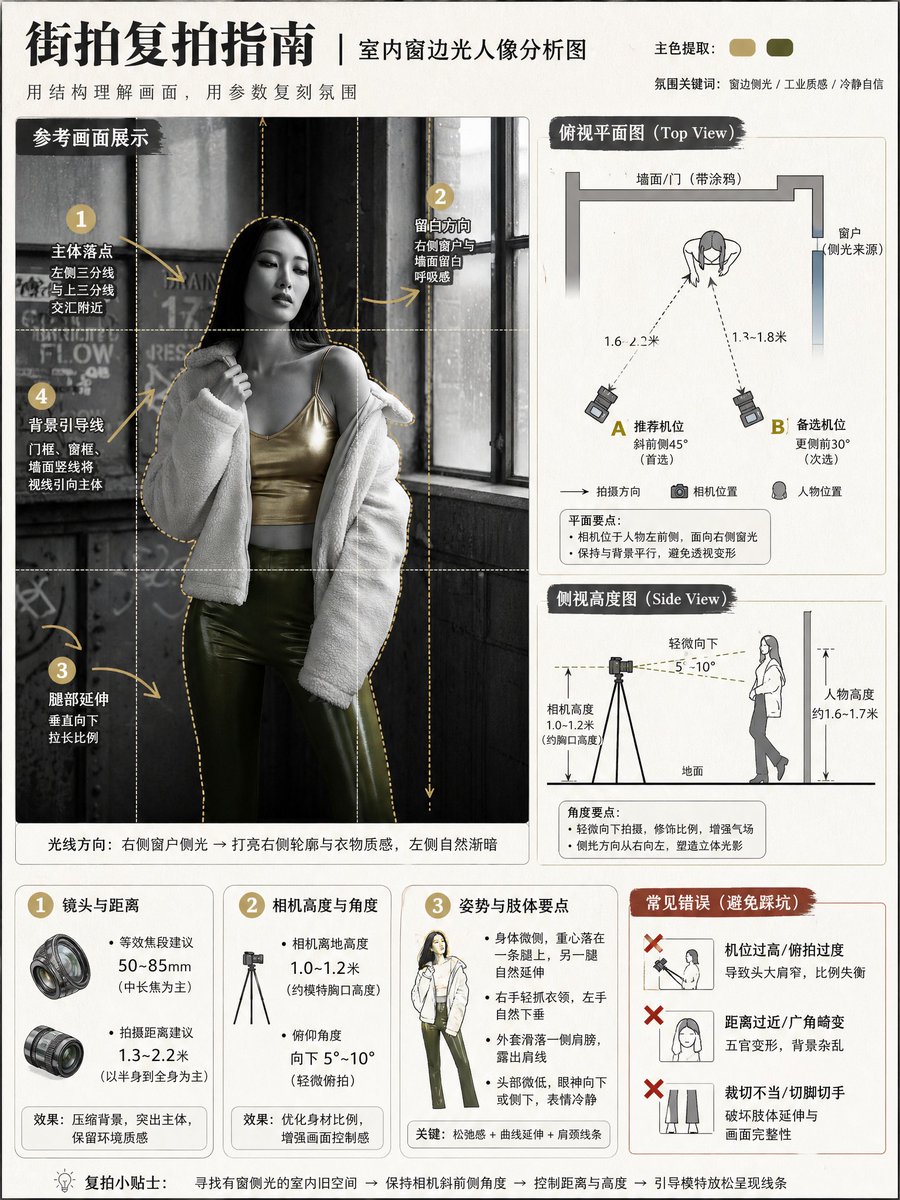
Using [{argument name="reference image" default="Image 1 Reference"}] as the sole visual basis, generate a vertical 3:4 {argument name="teaching topic" default="street photography knowledge analysis chart"} (educational infographic poster). Goal: Use clear and interesting diagrams to explain "subject position, camera position, lens/distance, camera height, shooting angle, and composition points" for the purpose of teaching others how to recreate the shot. Overall style: Clean and high-end photography tutorial infographic + light scrapbook-style annotations; light off-white paper texture or light gray background; mainly black, white, and gray; automatically extract 1–2 colors from Image 1 as accents; sharp lines, high information density but not cluttered, unified alignment, and strong readability.

Mandatory Rules:
- Must preserve the following from Image 1: subject pose, relative position between subject and environment, main background structural lines, lighting direction, and spatial logic.
- Do not change the pose or the scene; only provide an "analytical diagrammatic presentation."
- Faces are not the focus: they can be lightly blurred/simplified, no realistic beautification, no emphasis on facial features.
- Full Chinese; no English, no brand names, no watermarks, no UI interface elements.

Fixed Layout (remains the same every time, does not change with Image 1):
1) Main Visual Area (upper half or large image on the left): Place the "Reference Scene Display" (lightly stylized/illustrated based on Image 1, but with recognizable scene and posture), overlaid with: rule-of-thirds grid, subject outline box, leading line prompts, vertical/horizontal line correction prompts; use numbered dots + hand-drawn arrows to mark key points (subject landing point, negative space direction, leg extension direction, background leading line source).
2) Diagram Area (two side-by-side images on the right or bottom half):
- Top View: Use minimalist icons to draw wall/street/building boundaries (abstracted from Image 1), subject position (person icon), camera position (camera icon); must show shooting direction arrows, distance between subject and camera (dashed line + numerical range), recommended position points A/B (two alternative positions); camera orientation must match Image 1 (front/side/oblique, etc.).
- Side View: Draw ground line, subject height示意, camera height示意, tilt angle sector; must show camera height range from ground (reasonably inferred from Image 1), lens tilt angle range (reasonably inferred from Image 1); low angle/eye level/high angle must be correct.
3) Parameter Card Area (three fixed rounded-corner cards at the bottom):
- Card 1: Lens and Distance (give recommended equivalent focal length range + shooting distance range).
- Card 2: Camera Height and Angle (give camera height range + tilt angle range).
- Card 3: Pose and Body Points (summarize key points of the pose in Image 1 using short sentences).
4) Error Demonstration Area (fixed at the bottom right): 3 red-cross error prompts (automatically generated based on the most relevant issues in Image 1, short sentences), for example: don't use ultra-wide angle too close to the face, don't crop toes/fingers, don't use a camera position that's too high resulting in distorted proportions (adjust automatically based on Image 1's actual situation).

Automatic Inference Requirements (to make it usable for any replacement of Image 1):
- Automatically infer and write into the diagrams based on Image 1: camera orientation, camera height, shooting distance interval, equivalent focal length interval, subject landing point and cropping strategy, background leading line source.
- All numerical values should be expressed as "ranges" (credible and reproducible), do not provide a single fixed number.

Output Requirements:
High definition, sharp lines, natural shadows, unified icons, neat layout, readable information; no garbled text, no logos, no watermarks, no excessive decoration.

Negative Constraints:
No watermarks, no logos, no English, no garbled text, no overly realistic faces, no exaggerated cartoon proportions, no limb deformities/extra fingers, no cluttered layouts, no low resolution, no heavy filters, no changes to the subject pose or scene relationship of Image 1.
Original prompt
把【{argument name="参考图" default="图1参考图"}】作为唯一视觉依据,生成一张竖版 3:4 的{argument name="教学主题" default="街拍摄影知识分析图"}(教学信息图海报)。目标:用清晰有趣的图示把“人物位置、相机位置、镜头/距离、机位高度、拍摄角度、构图要点”讲明白,达到教别人复拍的目的。整体风格:干净高级的摄影教程信息图 + 轻手账式标注;浅米白纸感底或浅灰底;黑白灰为主;从图1自动提取1–2个颜色作为点缀;线条清晰、信息密度高但不杂乱、排版对齐统一、可读性强。

强制规则:
- 必须保留图1的:人物姿势、人物与环境的相对位置关系、主要背景结构线条、光影方向与空间逻辑
- 不改变姿势、不改场景,只做“分析图示化呈现”
- 人脸不作为重点:可轻度虚化/简化,不做写实美颜,不强化五官
- 全中文;不要英文、不要品牌名、不要水印、不要UI界面元素

固定版式(每次都一样,不随图1改变):
1)主视觉区(上半区或左侧大图):放置“参考画面展示”(基于图1轻度风格化/插画化,但场景与姿态可辨识),叠加:三分法网格、主体轮廓框、引导线提示、垂直线/水平线校正提示;用编号圆点+手绘箭头标注关键点(主体落点、留白方向、腿部延伸方向、背景引导线来源)。
2)示意图区(右侧或下半区,两张并列):
- 俯视平面图(Top View):用极简图标画出墙面/街道/建筑边线(从图1抽象),人物站位(小人图标),相机站位(相机图标);必须显示拍摄方向箭头、人物与相机距离(虚线+数值范围)、推荐站位点A/B(两个备选点位);相机方位必须与图1一致(正前/侧前/斜前等)。
- 侧视高度图(Side View):画出地面线、人物高度示意、相机高度示意、仰俯角扇形;必须显示相机离地高度范围(按图1推断给出合理区间)、镜头仰俯角范围(按图1推断给出合理区间);低机位/平视/高机位必须正确。
3)参数卡片区(底部三张圆角卡片固定):
- 卡片1:镜头与距离(给出等效焦段建议范围 + 拍摄距离建议范围)
- 卡片2:相机高度与角度(给出相机高度范围 + 仰俯角范围)
- 卡片3:姿势与肢体要点(用短句总结图1姿势的可复拍要点)
4)错误示范区(右下角固定):3条红叉错误提示(根据图1自动生成最相关的3条,短句化),例如:不要超广角贴脸、不要裁切脚尖/手指、不要机位过高导致比例失真(按图1实际情况自动调整)。

自动推断要求(让它每次替换图1都能用):
- 从图1自动推断并写入图示:相机方位、机位高低、拍摄距离区间、等效焦段区间、主体落点与裁切策略、背景引导线来源
- 所有数值用“范围”表达(可信、可复拍),不要给单一死数

输出要求:
高清、线条锐利、阴影自然、图标统一、排版整齐、信息可读;无乱码文字、无Logo、无水印、无多余装饰。

负面限制:
不要水印、不要Logo、不要英文、不要乱码、不要过度写实人脸、不要夸张卡通比例、不要肢体畸变/多手指、不要杂乱排版、不要低清晰度、不要厚重滤镜、不要改变图1人物姿势与场景关系。
Use this prompt in the VdoBloom image editor.
Opens the image editor with this prompt — add your own photo to generate.