Pixel Faded Landscape Poster
Full prompt
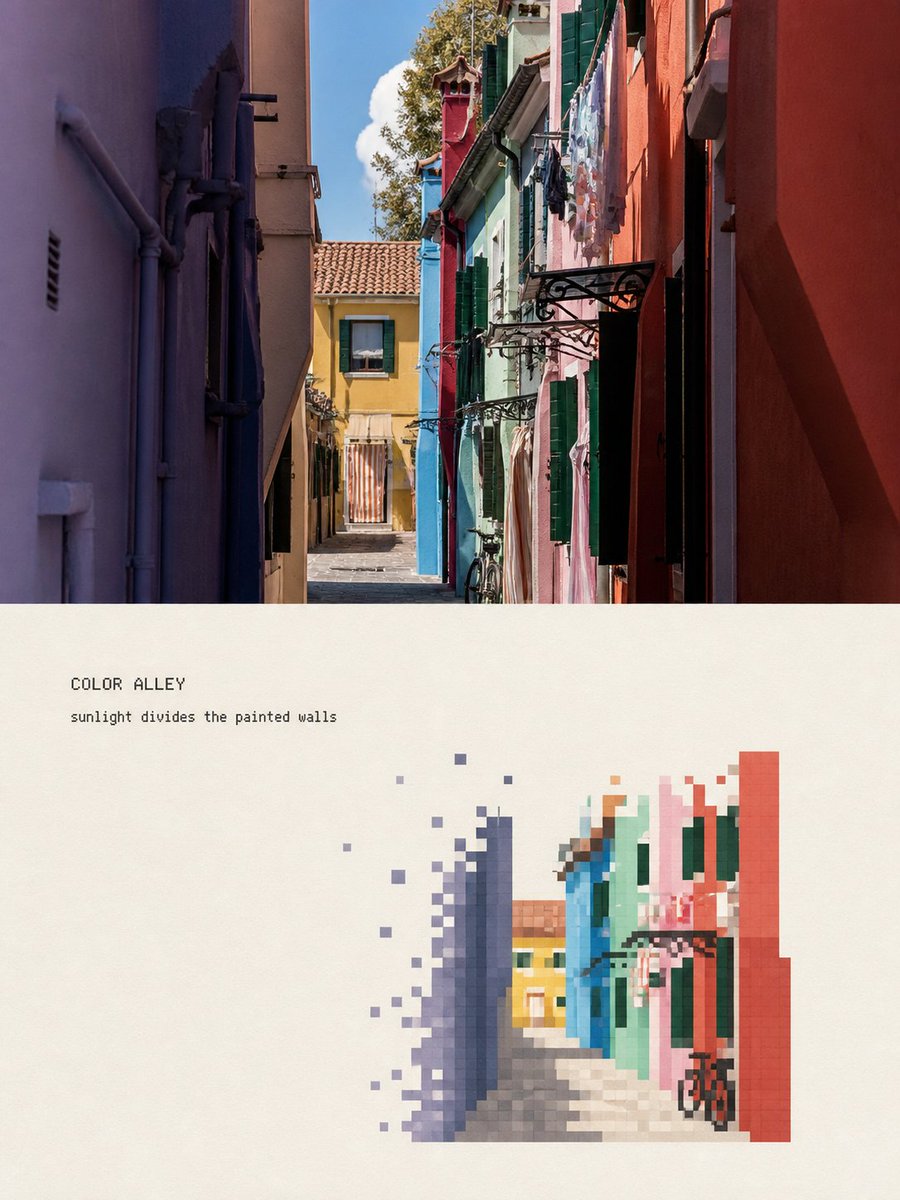
Please turn each of the travel photos I upload into an independent high-end editorial poster, with no multi-image splicing, each photo output individually. The overall layout uses a 3:4 vertical top-bottom contrast composition, with the upper and lower areas approximately 1:1, separated by a straight, clear, and clean horizontal boundary. Do not feather, permeate, or layer; do not shrink the original image into an icon, rounded card, or floating thumbnail. The upper half must retain the high-fidelity original photo. Accurately maintain the identity and quantity of subjects, architectural outlines, roof and window/door proportions, human poses, vehicles, bridges, boats, road directions, foreground/background occlusions, observation angles, real materials, natural light and shadow, and the original color atmosphere. Apply only slight, restrained color grading at the level of travel magazines, art publications, or photography exhibitions, and add a very thin film grain. Do not turn photos into illustrations; do not move, replace, add/delete, or distort subjects; do not change architectural and street perspectives. The lower half, on a warm off-white or light ivory paper surface, reorganizes the same scene into an 'artificial pixel vanishing landscape' with a large amount of white space. This is not a photo mosaic filter, nor is it lowering the resolution of the entire photo. First, select the most recognizable visual anchor from the photo, such as a bridge, a section of colored facade, a dome, a motorcycle, a bicycle, a boat, a gatehouse, or a group of clear roofs, then retain only the minimum elements that can illustrate the location and spatial relationship. Adopt a reduced and refined secondary composition: the subject usually occupies only about 30%–50% of the width and about 30%–50% of the height of the re-rendering area, concentrated in the middle-lower part, slightly to the left or right, and naturally arranged according to the direction of the original photo. Keep at least 50%–65% of the complete off-white paper surface blank on all sides. Do not completely fill the lower area with the original street scene. Only two or three layers of sparse pixel hints are kept in the background. Remove repeating window panes, fine tile lines, small signboard text, tourist shadows, dense pipelines, foliage, and photographic noise, but do not delete the eaves, bridge arches, domes, vehicle outlines, human poses, or road directions that determine the identity of the subject. Rebuild the body using discrete pixel blocks with clear edges, square or near-square: - Build the main outline, volume, light/shadow, and main color surfaces of the subject with medium-sized pixel blocks. - Use smaller, denser pixel blocks at key identification points such as eaves, spires, dome edges, window/door proportions, bridge arches, human poses, wheels, and prows. - Gradually reduce pixel density at the outer edges of buildings, vegetation, road surfaces, water surfaces, reflections, and distant views, causing squares to disconnect, dislocate, scatter, and disappear onto the paper surface. - The interior of the subject is relatively complete, and the periphery forms a clear pixel vanishing zone. - Vanishing must come from the decrease in the number and density of independent squares; do not use soft focus, feathering, smoke, transparent gradients, or pixel stretching. - A small number of discrete blocks can leave the subject along eaves, road perspective, water flow, terrain, or movement direction, but must not become random digital glitches. The color scheme is completely extracted from the current photo and compressed into about 6–12 main color steps. Retain the subject's 1–3 most recognizable colors, and then use adjacent light and dark colors to establish volume. Environmental colors are reduced in saturation and unified to natural gray, slate gray, gray-blue, gray-green, wood brown, or the photo's own architectural colors. A small area of high-saturation color that actually exists in the photo can be used as a visual focal point, such as tail lights, doors and windows, or clothing colors. The off-white paper surface must be the largest color in the re-rendering area...
Original prompt
请将我上传的每一张旅行照片分别制作成一张独立的高级编辑海报,不多图拼接,每张照片单独输出。 整体采用3:4竖版上下对比构图,上下两个区域约为1:1,中间以笔直、清楚、干净的水平边界分隔。不要羽化、渗透或叠层,不要把原图缩成角标、圆角卡片或悬浮缩略图。 上半部分必须保留高保真的原始照片。准确保持主体身份与数量、建筑轮廓、屋顶与门窗比例、人物姿态、车辆、桥梁、船只、道路方向、前后遮挡、观察角度、真实材质、自然光影和原有色彩氛围。仅进行轻微、克制的旅行杂志、艺术出版物或摄影展级调色,并加入极薄胶片颗粒。不得把照片画成插画,不得移动、替换、增删或扭曲主体,不得改变建筑和街道透视。 下半部分在温暖米白或浅象牙色纸面上,将同一场景重新组织为一幅具有大量留白的“人工像素消隐景观”。这不是照片马赛克滤镜,也不是把整张照片降低分辨率。 先从照片中选择一个最有识别度的视觉锚点,例如一座桥、一段彩色立面、一座穹顶、一辆摩托车、一辆自行车、一艘船、一个门楼或一组明确屋顶,再只保留能够说明地点和空间关系的最少元素。 采用缩小提炼的二次构图:主体通常只占转绘区宽度约30%–50%、高度约30%–50%,集中在中下部、偏左或偏右,并依据原照片的方向自然安排。四周保留至少约50%–65%的完整米白纸面。 不要把原始街景完整铺满下半区域。背景只保留两三层稀疏像素暗示。删除重复窗格、瓦片细纹、招牌小字、游客杂影、密集管线、枝叶与摄影噪声,但不得删掉决定主体身份的屋檐、桥拱、穹顶、车辆轮廓、人物姿态或道路方向。 使用边缘清楚、正方或近似正方的离散像素块重新搭建形体: - 以中等尺寸像素块建立主体的大轮廓、体量、明暗和主要色面。 - 在屋檐、塔尖、穹顶边缘、门窗比例、桥拱、人物姿态、车轮、船头等识别关键处使用更小、更密的像素块。 - 在建筑外缘、植被、路面、水面、倒影和远景处逐渐减少像素密度,使方块断开、错位、散落并消失到纸面。 - 主体内部相对完整,外围形成清楚的像素消隐带。 - 消隐必须来自独立方块数量与密度的下降,不得使用柔焦、羽化、烟雾、透明渐变或像素拉伸。 - 少量离散方块可以沿屋檐、道路透视、水流、地形或运动方向离开主体,但不能成为随机数字故障。 配色完全从当前照片提取并压缩为约6–12个主色阶。保留主体最具识别度的1–3个颜色,再用相邻深浅色建立体积。 环境色降低饱和度,并向自然灰、石灰色、灰蓝、灰绿、木褐或照片自身的建筑色统一。可以将照片中真实存在的一处小面积高饱和色作为视觉跳点,例如尾灯、门窗或服装颜色。 米白纸面必须是转绘区的最大色…
Use this prompt in the VdoBloom image editor.
Opens the image editor with this prompt — add your own photo to generate.